How to Upload Music Files using sFTP in Azuracast?

How to Upload Music Files using sFTP in Azuracast?

How to Upload Music Files using sFTP in Azuracast?

Home » Tutorial

In the early days of Azuracast, connecting via SFTP was a bit tricky and hard.

docker run –rm \\\\\\\\\\\\\\\\

    -v azuracast_station_data:/home/azuracast/stations \\\\\\\\\\\\\\\\

    -p 2222:22 atmoz/sftp:alpine \\\\\\\\\\\\\\\\

    azuracast:C27b6889c75ee8238e2:1000::stations

Especially for the newbies or for users who are not confident with using the shell command, the code above is not something they want to try.

Good thing, Azuracast has improved a long the way. With the latest AzuraCast version, SFTP connection has been made easier. So I will be guiding you on how to create an SFTP user and then connect the user using several FTP clients such as Coda 2 for Mac users, the more popular one, FileZilla and for advanced users, the Terminal command.

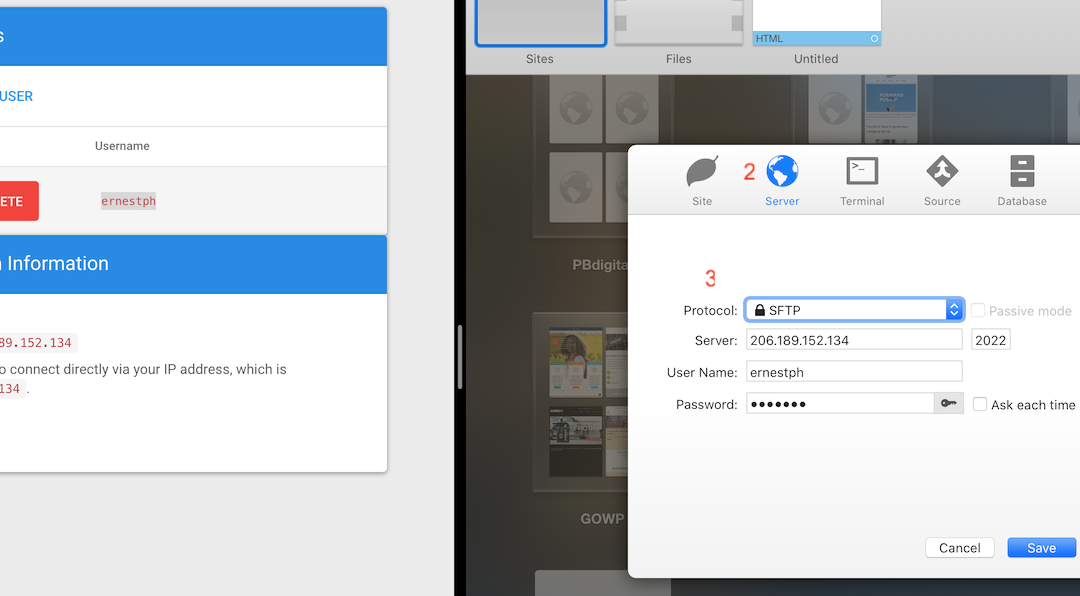
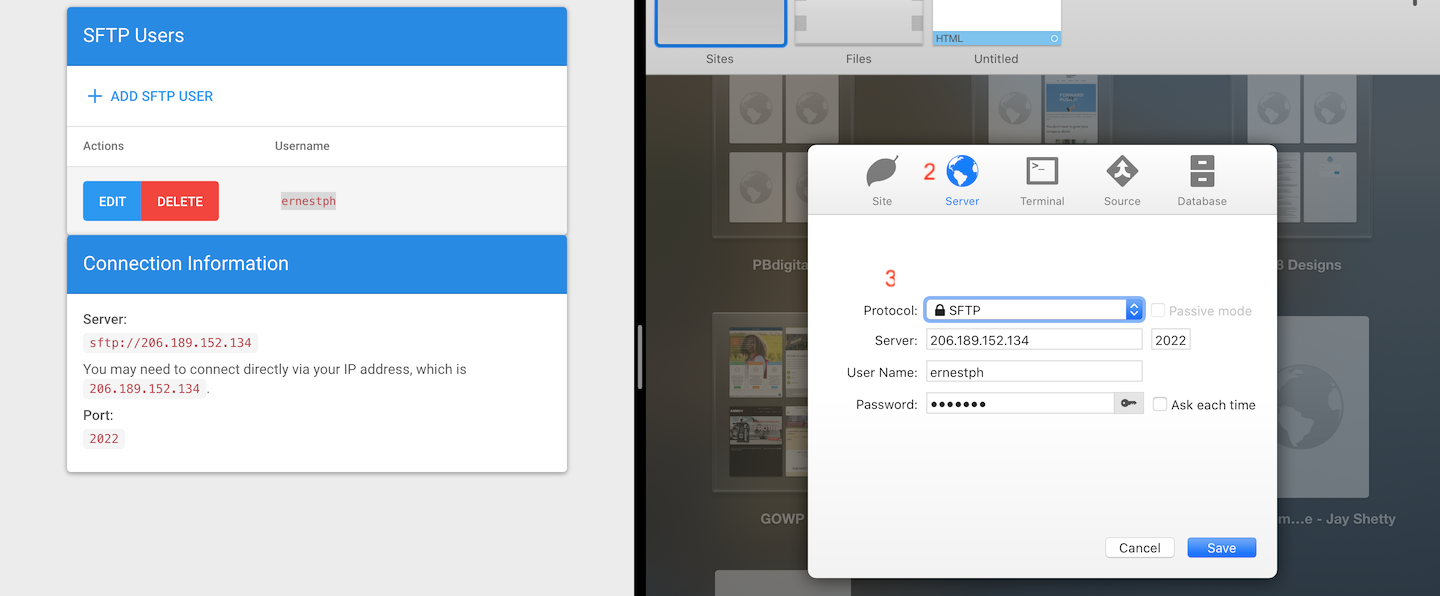
Create the SFTP user

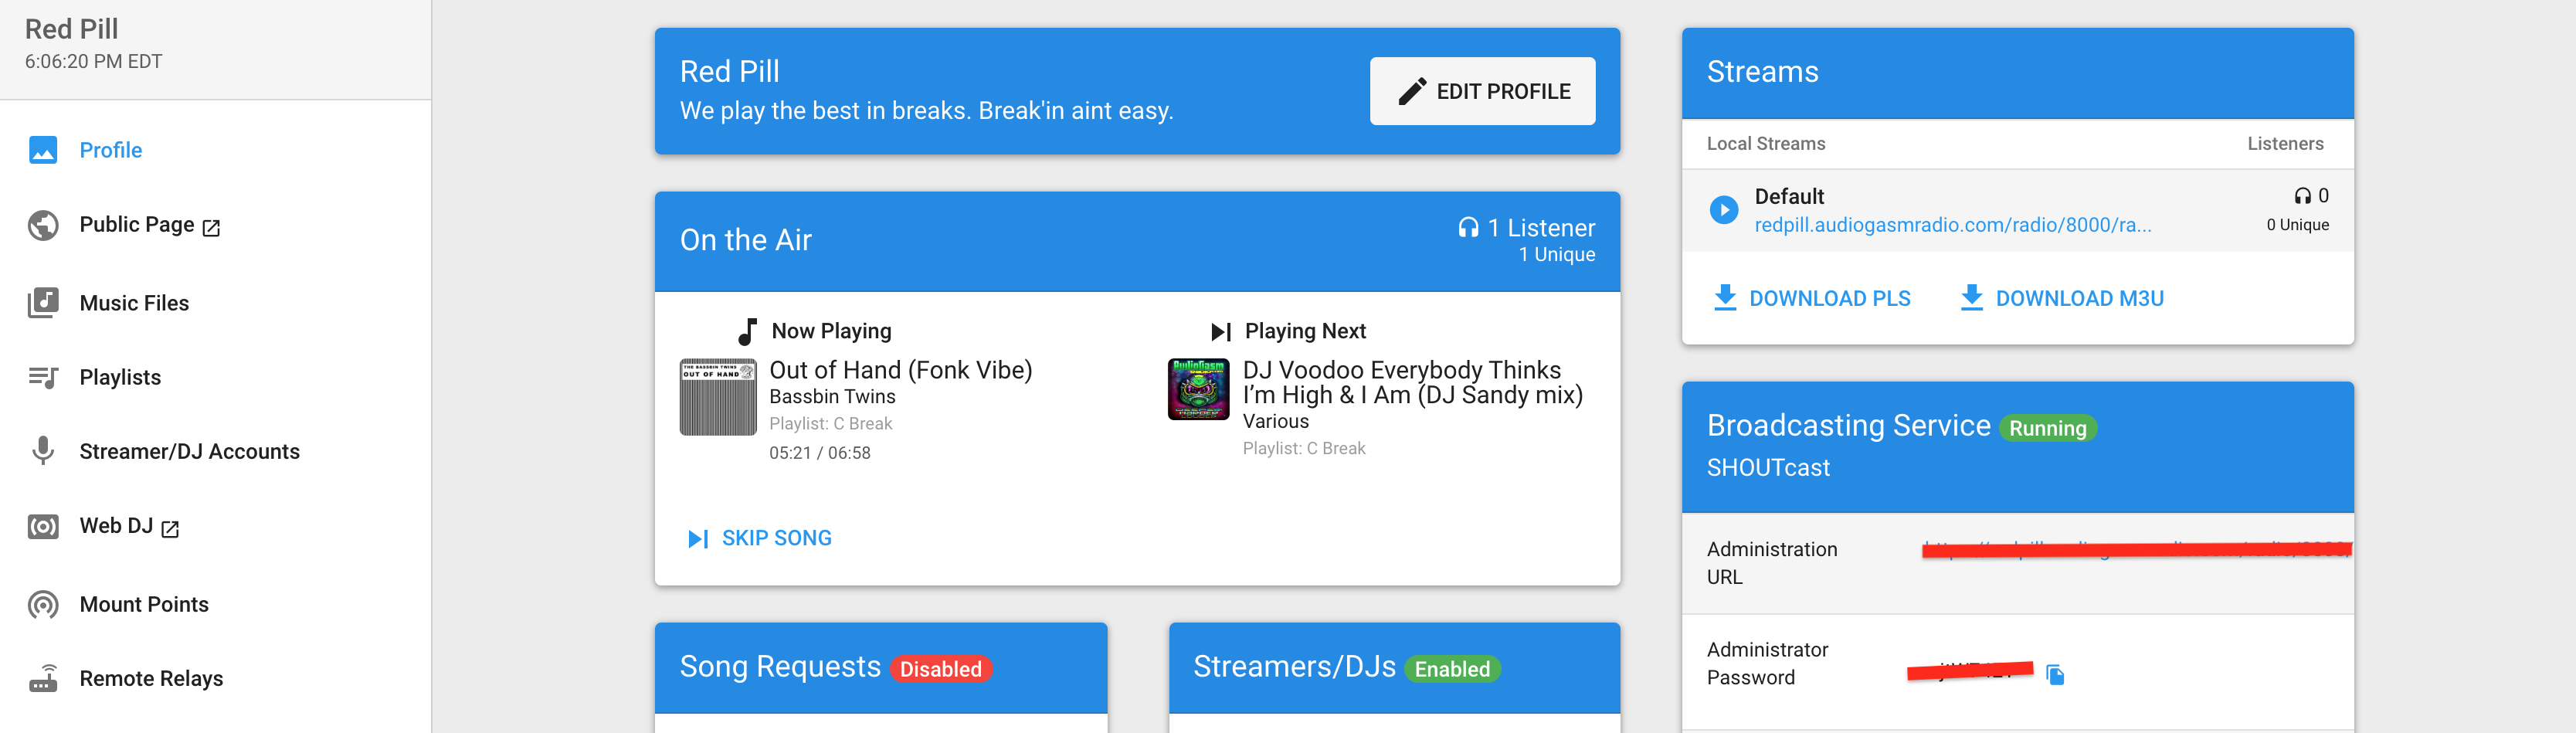
On the sidebar, under Utilities >> click SFTP user

Click “Add SFTP user” then fill up the username and password. Note that “SSH Public Keys” is optional but recommended if you don’t want to use a password when connecting.

Once you have the user, take note of the IP address and port number located on the right sidebar under “Connection Information”.

Once you have the prerequisites, it’s now time to connect using FTP clients.

Connect using Coda 2 by Panic

Open the application. Click the + button located at the bottom left. Then click the server tab and add the parameters. Protocol must be SFTP. Fill up the following fields using the (dynamic) informations from the SFTP tab of your Azuracast panel.

Click save then double click the information to connect. Once connected, you can now upload your audio files directly or create folders first to organize them.

Troubleshooting tips:

If files under Music files tab are not in-sync with the files in the SFTP client, do the following until it’s showing:

  1. Reload broswer
  2. Create a new folder – https://share.getcloudapp.com/jkuK6yOr
  3. In your SFTP client, refresh the directory (right click on your mouse then choose refresh)
  4. If it’s still not showing, reprocess media by navigating to /var/azuraast then executing ./docker.sh cli azuracast:media:reprocess command.

    cd /var/azracast

    ./docker.sh cli azuracast:media:reprocess


    https://share.getcloudapp.com/mXuqv7DB (Note: You must have root privileges to do this. If not permitted, please inform your system administrator.)

Connect using FileZilla

Open the application. On the Host field: Enter the correct format sftp://domainOrIP. On my example, the hostname should be sftp://206.189.152.134.

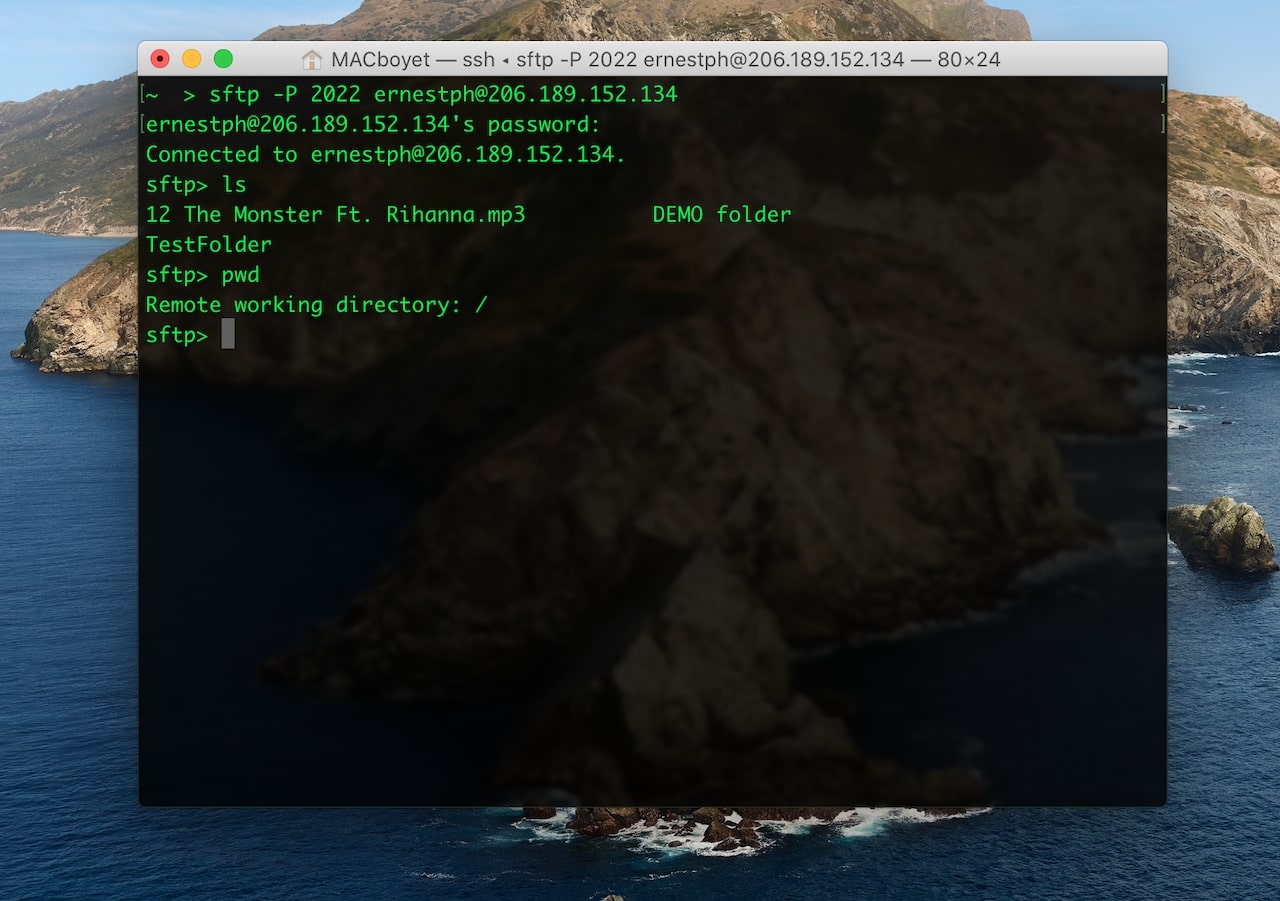
Connect using Mac Terminal

Open the application. This format should be followed:

sftp -P(not p) {port#} username@IP

Example, sftp -P 2022 [email protected] then hit enter. Type the password when prompted.

Tips:

  1. To upload files use “put{filename}.
  2. Make sure that your are on the right directory. To check local dirctory use “lpwd” command.

How to Ban a malicious IP in Azuracast?

How to Ban a malicious IP in Azuracast?

How to Ban a malicious IP in Azuracast?

Home » Tutorial

There are times when checking your listeners, (in Reports tab >> Listeners) you might encounter unwanted IPs. Mostly these IPs have an “EMPTY” user agent. They have a longer listening Time (sec). So you might ask yourself, “how can I ban these IPs?”


In Azuracast, banning an IP works the same way, with other radio hosting platforms. For the regular user, you can use the Azuracast UI to ban the IP on your streaming media server. And here’s how to do it:

For SHOUTCAST

Click Profile tab >> click Administration URL under Broadcasting Service section >> enter the username and password. Take note that the default user will always be “admin”. Still, on the Broadcasting Service section, copy and enter the “Administration password”.

Once you are inside the SHOUTcast panel, do this in the following order:

  1. Click Ban list
  2. Enter the IP address to ban
  3. Click Ban single IP or Ban whole subnet for multiple range
  4. Check to review if the IP is on the list. You can also click remove to unban it.

Check the image below for visualization.

For ICECAST

There’s no easy way to ban an IP on your ICEcast streaming server. As the admin settings have no interface to ban an IP add. You should be at least an advanced user and confident with terminal (SSH) commands.

To make the banning of an IP possible, you have to edit your nginx.config file.

Take note that Azuracast is hosted on a Nginx server and not Apache. This means that banning an IP using .htaccess is not possible.

A tutorial has been documented in Github on how to do it the hard way. You might want to check it out.

How to set up Admob advertising for published and unpublished radio app?

How to set up Admob advertising for published and unpublished radio app?

How to set up Admob advertising for published and unpublished radio app?

Home » Tutorial

Here at Internet Radio Cast on VPS, we are guiding you how to set up Admob advertising in case you want to monetize your radio mobile app.

Set up an unpublished app

By default, our app will enable Admob advertising for Banner and Interstitial Ads on Category unless requested by the customer to disable it. And because of that, we will be asking you to send us the generated codes for Banner and Interstitial ad unit.

All in all we need the following:

  • Admob publisher ID
  • App ID
  • Banner ad unit ID
  • Interstitial ad unit ID

Please check the tutorial video on how to generate the ad units and where to find the App and publisher IDs.

Set up a published app

If your app has been published already, you can still advertise by following these steps.

  1. Sign in to your AdMob account at https://apps.admob.com.
  2. Click Apps in the sidebar.
  3. Click Add app. A dialog box appears.
  4. Click Yes.
  5. Enter the name of the app and click Search.
  6. Click Add beside the app you want to add.

Video tutorial: Auto Login to your Azuracast server

Video tutorial: Auto Login to your Azuracast server

Video tutorial: Auto Login to your Azuracast server

Home » Tutorial

Here at Internet Radio Cast on VPS, we are constantly updating our website’s features. This is to make our customers happy and satisfied with the services and products that we offer.

On our recent updates, you can now auto login to your Azuracast server. Please check the video above or in Youtube.

Thank you for watching!

How to Submit a Ticket?

How to Submit a Ticket?

How to Submit a Ticket?

Home » Tutorial

Do you know how to submit a ticket already? If not, then it’s good news to our customers, getting help is made even easier here at Internet Radio Cast on VPS.

If you have any concerns or inquiries, you can always contact us via chat (the floating bubble). However, in such times, the chat support is unavailable and/or problems need to be monitored daily. For that reason, we provide a new form of communication. And that is the use of ticket form submission.

So how can you submit a ticket properly?

1. On the secondary navigation located at the top right, click the submit ticket menu.
2. As a result, this will then redirect you to the submission page.

  • While on the page, enter your credentials and log in.

While on this page, you can also check all your previous tickets. Just click the “My tickets” button on the top left.

3. Also in the form, add your subject and briefly explain the problem and why you need help. And then, choose the product you needed help.

  • All 3 fields are necessary.
  • The 4th field which is uploading of supporting documents is not necessary. However, it is essential to understanding the issue.

4. Finally, click the submit ticket button to send your concerns to our support team immediately.

Upon receiving your request.

  • Certainly, replies will be in less than 24 hours or as soon as possible.
  • Even more, investigation of the issue will start immediately.

Also take note that the deletion of images will take effect immediately, once tickets are closed.

Thanks to Awesome Support for providing this plugin.

How to Fund my eWallet and How to Transfer Funds to Another Account?

How to Fund my eWallet and How to Transfer Funds to Another Account?

How to Fund my eWallet and How to Transfer Funds to Another Account?

Home » Tutorial

For some time now, few of our customers and visitors kept asking how our billing works. They’re asking if we are capable of adding funds. And even transferring funds from one account to another, in case they have multiple accounts with us.

We heed to their request and so we are now adding new features.

Here are the steps in Adding and Transferring funds:

Adding of Funds

  1. Log in to your account.
  2. After that, click My Wallet.
    • In image_exhibit 1 shown below, you can see a list of all transactions where your “My Wallet” has been used. Either in purchasing products, funding or transferring funds to another account.
  3. To continue with adding funds, navigate to the “Add Funds” menu.
  4. Enter the amount of money to fund your account. (Minimum funding is $10 and Maximum funding is $200)
  5. Then, click Add after.
    • You will now be redirected to the Checkout page. From there, just fill the required fields and then place your order.
  6. Once payment has been made, the funds will now be reflected in your account. As shown in the wallet icon, in the top right header menu.


Transferring of funds to another account

  1. Click the Wallet transfer icon
  2. There are 3 fields to be completed
    • The email address of the recipient – Make sure that the email address has been registered already otherwise, no results will be found in the search field.
    • The Amount – The amount that will be debited from your account. Minimum fund transfer is $10.
    • The optional message – It’s an optional message explaining the purpose of the fund transfer.
  3. Once you completed the required fields, just click the transfer button and you are done.

Both parties will received email notification of the transaction. And will be recorded for keep sake purposes.

But the good news about this feature…

For every newly registered user who bought their first product, a cash back program of $5 will be credited to their wallet! This can then be use for their next purchase or subscription!

Happy streaming everyone!!!

Thank you to Terra Wallet for providing this useful plugin!

Updated: June 25, 2019 – Cash back program is no longer active.